Latest reviews,hacks,costomizations for geeks in windows softwares

komli

Your Ad Here

Contact me

Hope you guys liked my tips and tricks and implement it as soon as possible. For any of your doubts and clarifications e-mail me to vip_led@gmail.com

To Install Windows XP on Your Pre-Installed Vista Computer!

The question I am asked most often is "How do I install a dual-boot with Windows XP on my new Windows Vista computer?" The answer is that it's not that difficult, it's just very time consuming, and you need to own a copy of Windows XP.

Note that you should not attempt this if you aren't ready to troubleshoot any problems that might occur.

The first issue we encounter is that computers with pre-installed operating systems take up the entire drive. Luckily Microsoft included the Shrink volume feature in Vista, so we can easily shrink the Vista partition down to make room for XP.

Open the Computer Management panel, which you can find under Administrative tools or by right-clicking the Computer item in the start menu and choosing Manage. Find the Disk Management item in the list and select that.


Now we'll shrink our volume down by right-clicking on the main hard drive and choosing Shrink Volume.


Now you can choose the size that you want to shrink, which really means you are choosing the size that you want your XP partition to be. Whatever you do, don't just use the default. I chose roughly 10gb by entering 10000 into the amount.


The next step might be confusing, because we need to change the cd-rom drive that's invariably taking up D: at the moment, because we want to use D: for the Windows XP partition, but it's already taken by the cd-rom drive. If you skip this step than XP will install onto the E: drive, which isn't the end of the world, but it's not quite as tidy.

Right-click on the cd-rom drive in the list and choose Change Drive Letter and Paths from the menu.


Now we'll change the CD drive to use E: by selecting that in the drop-down.


Now we can create a new partition for XP to live on and make sure that the drive letter is set the way we want. If you do not create a partition now the XP install will do so automatically, but it's easier and cleaner to do it this way.

Right-click on the Unallocated free space area and then select New Simple Volume from the menu.


Follow through the wizard and select whatever options you'd like, making sure to use D: as the drive letter.

Now you will need to close out of disk management and reboot your computer. This is because we can't do the next step until we reboot. (you can try, but it won't work)

So we've come back from rebooting… open up Computer from the start menu and then right-click on the D: drive and select properties. Give your partition a meaningful name like "XP". It would be wise to name the C: drive to "Vista" at this point as well.


Now you'll want to pop your XP cd into the drive and boot off it. You may have to configure your BIOS to enable booting off the CD drive, or if your computer says something like "Hit Esc for boot menu" you might want to use that.

Once you come to the screen where you can choose the partition to install on, then choose either the unpartitioned space or the new partition you created. Whatever you do, don't try and install onto your Vista partition! See how much cleaner it is now that we've labeled each partition distinctly?


We'll assume XP is completely installed at this point, and you will have lost your ability to boot into Windows Vista, so we'll need to use the VistaBootPro utility to restore the Vista boot loader.

Download and install VistaBootPro from vistabootpro.org

During the install you'll be forced to install the .NET 2.0 framework. Open up VistaBootPRO and then click on the System Bootloader tab. Check the "Windows Vista Bootloader" and then "All Drives" radio buttons, and then click on the Install Bootloader button.


At this point, the Windows Vista bootloader is installed and you'll only be able to boot into Vista, but we'll fix that. Instead of manually doing the work, we'll just click the Diagnostics menu item and then choose Run Diagnostics from the menu.

image

This will scan your computer and then automatically fill in the XP version.. click on the "Manage OS Entries" tab and then click in the textbox for Rename OS Entry, and name it something useful like "Windows XP" or "The Windows That Works"


Click the Apply Updates button and then reboot your computer… you should see your shiny new boot manager with both operating systems in the list!


If you get an error saying "unable to find ntldr" when trying to boot XP, you'll need to do the following:
  • Find the hidden files ntldr and ntdetect.com in the root of your Vista drive and copy them to the root of your XP drive.
  • If you can't find the files there, you can find them in the \i386\ folder on your XP install cd
This is a critical piece of information: Windows XP will be installed on the D: drive, even in Windows XP… so you'll need to keep that in mind when tweaking your system.


You can share information between the drives, but I wouldn't recommend messing with the other operating system's partition too much… it might get angry and bite you. Or screw up your files. What I do recommend is that you store most of your files on a third drive shared between the operating systems… you could call that partition "Data".

I'm going to write a number of followup articles dealing with all of the issues with dual-boot systems, so subscribe to the feed for updates.

DirectX 10: A toast for gamers!

DX10 is a set of APIs (an API is a layer of software that tells other
software and hardware how to interact with it) that enables next-
generation gaming; by “next-generation,” we mean beyond what
consoles would be capable of in the years to come. DirectX 10 will
offer a variety of new features and new tricks to old tasks which
will take the visual fidelity and the performance of games built
using the API to a new level. With DX10 in particular and Vista in
general, Microsoft has shifted the onus of graphics rendering from
the processor to the graphics card.


You’ll see more detail in all characters

showed character faces with pockmarks, handlebar moustaches, detailed lips and eyes, and realistic facial expressions. DX10 also offers better shadows. For DX9 games, you might have noticed that turning on shadows for every character on screen can quickly bring the frame rate to its knees. This is because shadow calculations were done using the CPU. Now this code path can be moved to the
GPU and the result will be more detailed shadows and shadows that do not make the system crawl.


Note the pock-marked skin

Richer scenes:
DirectX10 allows for better volumetric effects. This feature was
ably showcased by upcoming DX10 game Alan Wake, where one can


Games like Alan Wake will bring surreal lighting to your desktop.


see clouds and weather effects never seen before—including an extremely realistic thunderstorm and a tornado. DX10’s volumetric effects allow for thicker clouds and scattering of light DirectX10 also offers more accurate reflections allowing modelling of choppy seas and water bodies.


Can you tell the difference?

Other benefits offered by DirectX 10 include:

1. A brand new Geometry Shader added between the vertex and
pixel shaders.
2. Increased efficiency (Microsoft claims performance improve-
ments up to six times that of DirectX 9 hardware running on
Windows XP because of this)
3. Less overhead on the processor will let a game put more objects
on screen.
4. Virtualised memory for the GPU. The video card will be able to
use space in system RAM to store information that does not fit
on local video card memory.
5. Shader Model 4.0, which has a broader instruction set and
offloads more work to the GPU.
6. Everything is now programmable and done with shaders.
7. Video cards will all have the same basic architecture; no more
worrying about what one DX10 card offers vis-à-vis another
8. Modelling fluid-like behaviour in for particle systems.
9. Increase in memory texture. Textures were 2048 x 2048 or 4096
x 4096 in DirectX 9; in DX10 they’re 8192 x 8192
XInput. You can now use Xbox 360 peripherals with Windows
Vista.
10. More life-like materials and characters with:
— Animated fur & vegetation
— Softer / sharper shadows.
11. Richer scenes; complex environments
— Thicker forests, larger armies!
— Dynamic and ever-changing in-game scenarios.
12. Realistic motion blurring
— Volumetric effects
— Thicker, more realistic smoke/clouds
Other
— Realistic reflections/refractions on water/cars/glass.
13. Reduced load on CPU
— Re-routes bulk of graphics processing to GPU
— Avoids glitching and system hangs during game play.

Speed Up Your Vista Installation with vLite on a Flash Drive


Sometimes the most effective way to clean up Windows is to just wipe your hard drive and start over with a fresh re-installation, and that process can be so long and tedious—unless you know the shortcuts. Power Windows re-installers already know about slipstreaming with nLite for XP and using vLite for Windows Vista to trim down your installation disk to just the bare essentials and speed up the process. If you want to speed up your reinstall even further, you can copy your Windows installation files over to a bootable USB stick that has much better transfer rates. Here's how.

Create Your Custom vLite Install:

You already know the details of how to use vLite, since that's been covered already. What we're going to do is follow the same steps, customizing anything that you want to change...


Then you'll want to click the Apply button at the bottom when you are done.


VLite will prompt you to rebuild the installation files, which it copied to your hard drive. This process will take quite a long time, but at the end your source files should be updated.


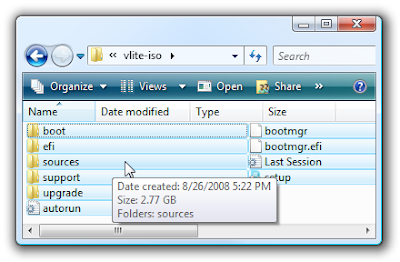
You should now have a folder with installation files that look very similar to the actual installation CD. These are the files we will need to copy to your flash drive.


Of course you could simply use the regular Vista DVD, or even just mount your vLite ISO image instead, but this saves you from the extra step.


Prepare Your USB Drive:

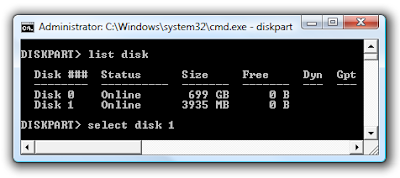
Open up an administrator mode command prompt by right-clicking on the shortcut and choosing Run as Administrator, then type in diskpart to load up the disk partitioning command line tool.


The most important step is to run the following command, which will give you the numbers of the disks, so you can use it in the next command (and not accidentally remove a partition on another drive).

list disk


Now that you know the correct number for the disk, you can use the select disk command, substituting the number 1 for whatever number your flash drive is set to:

select disk 1


Now you can run the rest of the commands, which will remove any partitions before creating a new FAT32 partition and setting it to active so it can boot.

clean
create partition primary
select partition 1
active
format fs=fat32
assign
exit


That final assign command will let you access the drive from Explorer, so we can copy the files. You'll want to copy all of the files from your installation DVD or from the vLite folder over to your flash drive.


At this point you should be able to stick the USB drive in your computer and boot from it. Note that you might have to enable USB flash booting support in the BIOS, and often it helps to use the shortcut key for your BIOS boot menu.


Got any other tips for a speedy Windows installation? Let me know in the comments.

A Look At Internet Explorer 8 Beta 1

I realize Internet Explorer 8 Beta 1 has been reviewed on several locations on the net. However, I would not be doing our loyal reader's justice without expressing our take on the new browser. So, wanna hear it? Here it go!

Installation:

**Keep in mind this is my experience on my work machine running XP Pro SP2, depending on your configuration and OS results may vary**

I thought installation would be pretty straight forward. The UI for installation looks exactly like IE 7 which should be familiar. Of course Microsoft makes you update various updates just to install IE 8 even though you may not want to install them. I tried to uncheck the Install updates box and Microsoft insists on protecting myself from myself. Well … I can always remove what I don't like so … I will continue on.


Uh Oh! If you have Firefox set as your default browser (which I encourage most users to do) IE 8 doesn't like it! Ok … perhaps installation is not as straight forward as I anticipated.


So, I launched IE 7 and made it my default browser. Which is easy enough but unnecessary in my opinion. Tools \ Internet Options \ Programs \ Make Default.


Well, I had to start the install process all over again just so Microsoft could point me to the wonderful Validation Required page! This update indicates an issue where the language bar crashes on multi-core machines. The machine I am on now is a single core CPU and I already disabled the language bar … but thanks for having my back MS!!!


After all of the validation and downloading the update I get to do another restart! Whooohooo!


Ok, after the restart I get to start the installation process all over AGAIN. Seems to be working … I hope.


Success! Oh … but wait … Another Reboot! Microsoft sure knows how to show me their WOW!


After the Restart it looks like I am finally ready to configure IE 8. I never let Microsoft choose my settings so I am selecting to choose them myself.


On the next screen I am asked about a search provider. Well, Google is currently set up as my current provider, but since this is a review I want to check out what IE 8 is going to offer so I chose a list of other providers.


Next … again as I am curious as to what IE 8 will offer I am selecting to choose a list of activity providers versus the standards.


It appears the initial set up is complete … I will leave the safety monitor on which is enabled by default. If it blocks any legitimate sites you can always add it to Trusted Sites.


Ok … since I wanted to see additional search sites IE 8 popped up the options page which include the usual Web Search engines and a list of various Topic Search sites. There is also still a field to create your own as well.

Fix for Firefox memory leak on Windows

This seems to help out with the memory usage quite a bit. Generally, when you minimize a window the memory usage goes way down because that application isn't active. Unfortunately, Firefox by default doesn't adhere to this behavior. Here's how to force it to.

Type the following into your address bar in Firefox:

about:config

You will see a window that looks similar to this:


You will want to right click anywhere in the window, choose New, Boolean, and enter in the following text:

config.trim_on_minimize

To change the value you can either doubleclick, or right-click and choose Toggle. You will have to restart Firefox, but after you do, you should notice the memory usage go way down whenever you have Firefox minimized.

Update: You will want the value to be set to True in order for this to work.

Command line hack for windows server

If you've worked on a network with Windows servers, you've encountered this error message at least 37,000 times:

"The terminal server has exceeded the maximum number of allowed connections. The system can not log you on. The system has reached its licensed logon limit. Please try again later."

This problem happens because Windows only allows two remote terminal services connections when you are in administrative mode, and you've either got two people already on that server, or more likely, you've got a disconnected session that still thinks it is active.

The problem with this error is that you have to actually get on the server console to fix the problem if the server isn't in a domain. (If you are in a domain, then just open Terminal Services Manager and log off or disconnect the sessions)


To use the command line hacks, you might need to run them from another server if your local operating system doesn't include the commands. You will also need to make sure that you are logged onto that server with an administrative account. The easiest way to do that is just map a drive (you don't have to use a drive letter unless you choose to)

net use /user:[username] \\servername\share


Here's a command line hack that you can use to figure out what sessions are connected to the server. Note that you could substitute the IP address for the server name.


query session /server:servername


Sample output:


Now we know that the session ID of the offending session is 2. We can use that in the next step, which is using the reset command to log off that user.

reset session [ID] /server:servername

Sample:


This command won't display any output, but when we run the query command again, we should see that the session has now been disconnected:


Note: Thanks to my friend Vijay for this one.

Cool Tricks to Speed up Net surfing in Firefox

Type about:config in the address bar of the firefox

>> These settings are common to all the configuration files regardless of connection or computer speed with some additions - plugin paths can be found here about:plugins and the bookmark menu delay is turned off.

user_pref("network.http.proxy.pipelining", true);
user_pref("network.http.pipelining", true);
user_pref("content.notify.backoffcount", 5);
user_pref("network.http.pipelining.maxrequests", 8);
user_pref("ui.submenuDelay", 0);
user_pref("plugin.expose_full_path", true);

For Fast Computer Fast Connection:

user_pref("content.interrupt.parsing", true);
user_pref("content.max.tokenizing.time", 2250000);
user_pref("network.http.max-connections", 48);
user_pref("network.http.max-persistent-connections-per-proxy", 16);
user_pref("network.http.max-persistent-connections-per-server", 8);
user_pref("content.switch.threshold", 750000);
user_pref("content.notify.ontimer", true);
user_pref("nglayout.initialpaint.delay", 0);
user_pref("network.http.max-connections-per-server", 16);
user_pref("content.notify.interval", 750000);
user_pref("browser.cache.memory.capacity", 65536);

A couple settings to note - Firefox is allocated 4096 KB of memory by default and in this configuration we give it roughly 65MB as denoted by the last line. This can be changed according to what is used.

Fast Computer Slower Connection:
This configuration is more suited to people without ultra fast connections. We are not talking about dial up connections but slower DSL / Cable connections.

user_pref("content.max.tokenizing.time", 2250000);
user_pref("network.http.max-connections-per-server", 16);
user_pref("network.http.max-persistent-connections-per-proxy", 16);
user_pref("network.http.max-connections", 48);
user_pref("content.notify.interval", 750000);
user_pref("network.http.max-persistent-connections-per-server", 8);
user_pref("content.notify.ontimer", true);
user_pref("content.switch.threshold", 750000);
user_pref("nglayout.initialpaint.delay", 0);
user_pref("browser.cache.memory.capacity", 65536);

Fast Computer Slow Connection:

user_pref("browser.xul.error_pages.enabled", true);
user_pref("content.max.tokenizing.time", 3000000);
user_pref("content.maxtextrun", 8191);
user_pref("content.notify.interval", 750000);
user_pref("content.switch.threshold", 750000);
user_pref("content.notify.ontimer", true);
user_pref("network.http.max-persistent-connections-per-proxy", 8);
user_pref("network.http.max-connections", 32);
user_pref("network.http.max-connections-per-server", 8);
user_pref("content.interrupt.parsing", true);
user_pref("network.http.max-persistent-connections-per-server", 4);
user_pref("nglayout.initialpaint.delay", 0);
user_pref("browser.cache.memory.capacity", 65536);

Slow Computer Fast Connection:

user_pref("content.max.tokenizing.time", 3000000);
user_pref("content.notify.ontimer", true);
user_pref("content.switch.threshold", 1000000);
user_pref("nglayout.initialpaint.delay", 1000);
user_pref("content.notify.interval", 1000000);
user_pref("network.http.max-connections", 48);
user_pref("network.http.max-connections-per-server", 16);
user_pref("content.maxtextrun", 4095);
user_pref("content.notify.backoffcount", 5);
user_pref("network.http.max-persistent-connections-per-proxy", 16);
user_pref("network.http.max-persistent-connections-per-server", 8);
user_pref("dom.disable_window_status_change", true);

One of the changes made for this particular configuration is the final line where the status bar is disabled for changing web pages to save processor time.

Slow Computer Slow Connection:

We have entered the doldrums of the dial-up user

user_pref("content.max.tokenizing.time", 2250000);
user_pref("content.switch.threshold", 750000);
user_pref("nglayout.initialpaint.delay", 750);
user_pref("network.http.max-connections-per-server", 8);
user_pref("network.http.max-persistent-connections-per-proxy", 8);
user_pref("network.http.max-persistent-connections-per-server", 4);
user_pref("network.http.max-connections", 32);
user_pref("content.notify.interval", 750000);
user_pref("content.notify.ontimer", true);
user_pref("dom.disable_window_status_change", true);

Geeky hack video

Modify Shutdown Time in windows XP

Often times when XP is shutting down a dialog appears saying the system is waiting for a service to close. This tweak will reduce (or increase) the amount of time that expires before this warning appears. In some cases it may be desirable to allow the service more time, but most often a shorter delay is desirable. The lower the number entered the quicker the task will end.


[Start] [Run] [Regedit]

Registry Key: HKEY_LOCAL_MACHINE\SYSTEM\CurrentControlSet\Control

Modify/Create the Value Name [WaitToKillServiceTimeout]
according to the Value Data listed below.

Data Type: REG_SZ [String Value] // Value Name:
WaitToKillServiceTimeout

Value Data: [Default = 20,000 (expressed in milliseconds)
Modify to preference.]

Exit Registry and Reboot


Increase Internet Download Connections

Increase Simultaneous Internet Download Connections
Increases the number of allowed simultaneous connections to ten (10).
Instructions:


[Start] [Run] [Regedit]

Registry Key: HKEY_CURRENT_USER\Software\Microsoft\Windows\CurrentVersion\Internet
Settings


Modify/Create the Value Data Type(s) and Value Name(s) as
detailed below.

Data Type: REG_DWORD [Dword Value] // Value Name:
MaxConnectionsPer1_0Server


Setting for Value Data: [0000000a]

Modify/Create the Value Data Type(s) and Value Name(s) as
detailed below.

Data Type: REG_DWORD [Dword Value] // Value Name:
MaxConnectionsPerServer

Setting for Value Data: [0000000a]

Exit Registry and Reboot


Enjoy high speed connectivity!

Disable the Windows XP Startup Screen

If you've ever wondered what goes on behind the Windows Startup Screen when your computer boots, this will disable the screen and allow you to see what's really happening.

Click [Start] and right click on [My Computer]
Select [Properties]
Select the [Advanced] tab
In the [Startup and Recovery] section, click [Settings]
In the [System Startup] section, click [Edit] to open the boot.ini file in Notepad
You will see a line that looks similar to the one below

multi(0)disk(0)rdisk(0)partition(1)\WINDOWS="Microsoft Windows XP Professional" /fastdetect

To disable the Startup Screen change to line to read as below. The change is shown in red.

multi(0)disk(0)rdisk(0)partition(1)\WINDOWS="Microsoft Windows XP Professional" /fastdetect /sos
Note: There is a space between 'fastdetect' and '/sos'

Close Notepad, clicking [Yes] when Notepad asks if you want to save your changes.
Click [OK] [Apply] and [OK] to exit System Properties
Reboot computer and the Startup Screen will be gone.

Using System Restore in XP

Windows is well-known for having driver and .dll conflicts, as well as all sorts of software that causes problems with your computer. Luckily there's a System restore feature that can return your computer back to a known working configuration, as long as you've created a restore point.

Note that some software installations will create restore points automatically, but you should run it manually before installing any questionable applications. (Or better yet, don't install questionable applications!)


Creating a Restore Point Manually

To create a Restore Point click on Start \ programs\ Accessories \ System Tools \ System Restore, and you'll be given a a wizard screen.


Click on "Create a restore point" and then click the Next button. You'll be brought to a screen where you can type in a description for your restore point. Use something memorable if possible.


Once your restore point is created (which might take a while), you will get a confirmation screen.


All done creating the restore point!


Restoring from a Restore Point

To restore from a previously created restore point, open System Restore the same as above, but this time we'll select "Restore my computer to an earlier time". Note that System Restore is going to reboot your computer in order to restore.


Click the next button, and you'll be shown a calendar with bolded dates wherever there is a restore point. Click on the date, and then click a restore point in the right hand side.


You'll get a confirmation screen asking if you really want to do this. We'll assume that there's a problem requiring you to restore, so go ahead.


Your system will reboot and then restore your computer back to the previous configuration.

Make VLC Player Look like Windows Media Player 11

The VLC Media Player is an open source, cross-platform media client that supports the vast majority of media formats. One of the great features is that it supports skins that work across different platforms. This article will cover installing on both linux and windows.

You will first need to download the skin named WMP11 from the skins page. This skin looks a lot like Windows Media Player 11. It's not exact, but it's a pretty good skin.


To install on Windows:

Select the "VLC media player (skins)" option from the Start menu program group. This will start VLC in the right mode to select skins.


Right click on the title bar area, and choose Select skin \ Open skin and choose the skin file that you have downloaded.


Easy stuff. Now you have a great looking media player.

Update:Changed the article to point to the newer and better looking WMP11 skin instead of the Dalin one.